modelFile = "models/ssd_mobilenet_v2_coco_2018_03_29/frozen_inference_graph.pb"
configFile = "models/ssd_mobilenet_v2_coco_2018_03_29.pbtxt"
classFile = "coco_class_labels.txt"

if not os.path.isdir('models'):
    os.mkdir("models")

if not os.path.isfile(modelFile):
    os.chdir("models")
    # Download the tensorflow Model
    urllib.request.urlretrieve('http://download.tensorflow.org/models/object_detection/ssd_mobilenet_v2_coco_2018_03_29.tar.gz', 'ssd_mobilenet_v2_coco_2018_03_29.tar.gz')

    # Uncompress the file
    !tar -xvf ssd_mobilenet_v2_coco_2018_03_29.tar.gz

    # Delete the tar.gz file
    os.remove('ssd_mobilenet_v2_coco_2018_03_29.tar.gz')

    # Come back to the previous directory
os.chdir("..")Object Detection - TF
In this page we will be performing deep learning object detection, and we will be using SSD trained using Tensorflow. We will use OpenCV to read the model and perform inferencing testing on images.
- Architecture : Mobilenet based Single Shot Multi-Box (SSD) - which means we will make a Single Path forward through the network to perform imprints and yet detect several objects in the image. We are also using a mobilenet network which is smaller and intended for mobile devices
- Framework : Tensorflow
- COCO data set
Setup
- Automatic setup: By runnning the code cells below all the necessay files will be downloaded at once and will be ready to use.
- Manual Setup: In this case, you’ll have to download and perform the required setup manually.
We’ll shortcut the setup process for another page, so we will just download the setup instead. If you were to manually set this up here are the steps:
Instructions for Manual Setup
Download Model files from Tensorflow model ZOO
- Model files can be downloaded from the Tensorflow Object Detection Model Zoo: tf2_detection_zoo.md. There is an object detection model ZOO at this url where you can download alot of different models from that network
Download mobilenet model file
- From the link below you see we will be using a coco mobilenet_v2 model and if you uncompress it you’ll have the structure shown below
- You only need one file from the download (frozen_inference_graph.pb - the weights file)
- You can download the https://www.google.com/url?q=http%3A%2F%2Fdownload.tensorflow.org%2Fmodels%2Fobject_detection%2Fssd_mobilenet_v2_coco_2018_03_29.tar.gz and uncompress it.
- After Uncompressing and put the highlighed file (along with the folder) in a
modelsfolder.
ssd_mobilenet_v2_coco_2018_03_29
|─ checkpoint
|─ frozen_inference_graph.pb
|─ model.ckpt.data-00000-of-00001
|─ model.ckpt.index
|─ model.ckpt.meta
|─ pipeline.config
|─ saved_model
|─── saved_model.pb
|─── variables
Create config file from frozen graph
- Extract the files
- You can use the script next to generate the config file
- Run the tf_text_graph_ssd.py file with input as the path to the
frozen_graph.pbfile and output as desired. - The other two files you will need are listed in the code below: configFile and classFile. You can google coco dataset and you can retrieve the class labels file as well.
A sample config file has been included in the models folder
A Script to download and extract model tar.gz file.
The final directory structure should look like this:
├─── coco_class_labels.txt
├─── tf_text_graph_ssd.py
└─── models
     ├───ssd_mobilenet_v2_coco_2018_03_29.pbtxt
     └───ssd_mobilenet_v2_coco_2018_03_29
         └───frozen_inference_graph.pb
All that above has been done and saved in the assets below, so just download the assets
Download Assets
def download_and_unzip(url, save_path):
    print(f"Downloading and extracting assests....", end="")

    # Downloading zip file using urllib package.
    urlretrieve(url, save_path)

    try:
        # Extracting zip file using the zipfile package.
        with ZipFile(save_path) as z:
            # Extract ZIP file contents in the same directory.
            z.extractall(os.path.split(save_path)[0])

        print("Done")

    except Exception as e:
        print("\nInvalid file.", e)
URL = r"https://www.dropbox.com/s/xoomeq2ids9551y/opencv_bootcamp_assets_NB13.zip?dl=1"
asset_zip_path = os.path.join(os.getcwd(), "opencv_bootcamp_assets_NB13.zip")
# Download if assest ZIP does not exists.
if not os.path.exists(asset_zip_path):
download_and_unzip(URL, asset_zip_path)Check Class Labels
Note the difference between a traditional computer vision detector and deep learning models:
- We used to have separate and distinct models for each object class to detect, now
- the same deep learning model can detect multiple objects over a wide range of angle and scale
classFile  = "coco_class_labels.txt"

with open(classFile) as fp:
    labels = fp.read().split("\n")

print(labels)

# OUTPUT
['unlabeled', 'person', 'bicycle', 'car', 'motorcycle', 'airplane', 'bus', 'train', 'truck', 'boat', 'traffic light', 'fire hydrant', 'street sign', 'stop sign', 'parking meter', 'bench', 'bird', 'cat', 'dog', 'horse', 'sheep', 'cow', 'elephant', 'bear', 'zebra', 'giraffe', 'hat', 'backpack', 'umbrella', 'shoe', 'eye glasses', 'handbag', 'tie', 'suitcase', 'frisbee', 'skis', 'snowboard', 'sports ball', 'kite', 'baseball bat', 'baseball glove', 'skateboard', 'surfboard', 'tennis racket', 'bottle', 'plate', 'wine glass', 'cup', 'fork', 'knife', 'spoon', 'bowl', 'banana', 'apple', 'sandwich', 'orange', 'broccoli', 'carrot', 'hot dog', 'pizza', 'donut', 'cake', 'chair', 'couch', 'potted plant', 'bed', 'mirror', 'dining table', 'window', 'desk', 'toilet', 'door', 'tv', 'laptop', 'mouse', 'remote', 'keyboard', 'cell phone', 'microwave', 'oven', 'toaster', 'sink', 'refrigerator', 'blender', 'book', 'clock', 'vase', 'scissors', 'teddy bear', 'hair drier', 'toothbrush', 'hair brush', '']
Read TS Model
The steps for performing inference using a DNN (deep neural network) model are summarized:
- Load the model and input image into memory
- Detect objects using a forward pass through the network
- Display the detected objects with bounding boxes and class models
Define Files
# Specify the files needed by the model
modelFile  = os.path.join("models", "ssd_mobilenet_v2_coco_2018_03_29", "frozen_inference_graph.pb")
configFile = os.path.join("models", "ssd_mobilenet_v2_coco_2018_03_29.pbtxt")
Read TS Model
# Read the Tensorflow network which will return an instance of the neural network = net which is used further below to perform inprints
net = cv2.dnn.readNetFromTensorflow(modelFile, configFile)
Detect Objects
- Define a function with takes in the net instance and a test image
- Then calls a opencv function we’ve used before to prepare and setup the image for processing
- inputs are: image, scale factor set to 1, size of trained image at 300, mean of color, since opencv using different chanels than the image put in, resize and not crop the image
# For each file in the directory
def detect_objects(net, im, dim = 300):

    # Create a blob from the image
    blob = cv2.dnn.blobFromImage(im, 1.0, size=(dim, dim), mean=(0, 0, 0), swapRB=True, crop=False)

    # Pass blob to the network
    net.setInput(blob)

    # Peform Prediction/inprints which returns some number of objects that have been detected
    objects = net.forward()
    return objects
FONTFACE = cv2.FONT_HERSHEY_SIMPLEX
FONT_SCALE = 0.7
THICKNESS = 1Annotate Objects
def display_text(im, text, x, y):
    # Get text size
    textSize = cv2.getTextSize(text, FONTFACE, FONT_SCALE, THICKNESS)
    dim = textSize[0]
    baseline = textSize[1]

    # Use text size to create a black rectangle
    cv2.rectangle(
        im,
        (x, y - dim[1] - baseline),
        (x + dim[0], y + baseline),
        (0, 0, 0),
        cv2.FILLED,
    )

    # Display text inside the rectangle
    cv2.putText(
        im,
        text,
        (x, y - 5),
        FONTFACE,
        FONT_SCALE,
        (0, 255, 255),
        THICKNESS,
        cv2.LINE_AA,
    )
Display Objects
# Takes in the test image, list of objects detected, threshold
def display_objects(im, objects, threshold=0.25):
    rows = im.shape[0]
    cols = im.shape[1]

    # For every Detected Object retrieve class id and score
    for i in range(objects.shape[2]):
        # Find the class and confidence
        classId = int(objects[0, 0, i, 1])
        score = float(objects[0, 0, i, 2])

        # Recover original co-ordinates from normalized coordinates
        x = int(objects[0, 0, i, 3] * cols)
        y = int(objects[0, 0, i, 4] * rows)
        w = int(objects[0, 0, i, 5] * cols - x)
        h = int(objects[0, 0, i, 6] * rows - y)

        # Check if the detection is of good quality then annotate the frame with boxes
        if score > threshold:
            display_text(im, "{}".format(labels[classId]), x, y)
            cv2.rectangle(im, (x, y), (x + w, y + h), (255, 255, 255), 2)

    # Convert Image to RGB since we are using Matplotlib for displaying image
    mp_img = cv2.cvtColor(im, cv2.COLOR_BGR2RGB)
    plt.figure(figsize=(30, 10))
    plt.imshow(mp_img)
    plt.show()
Results
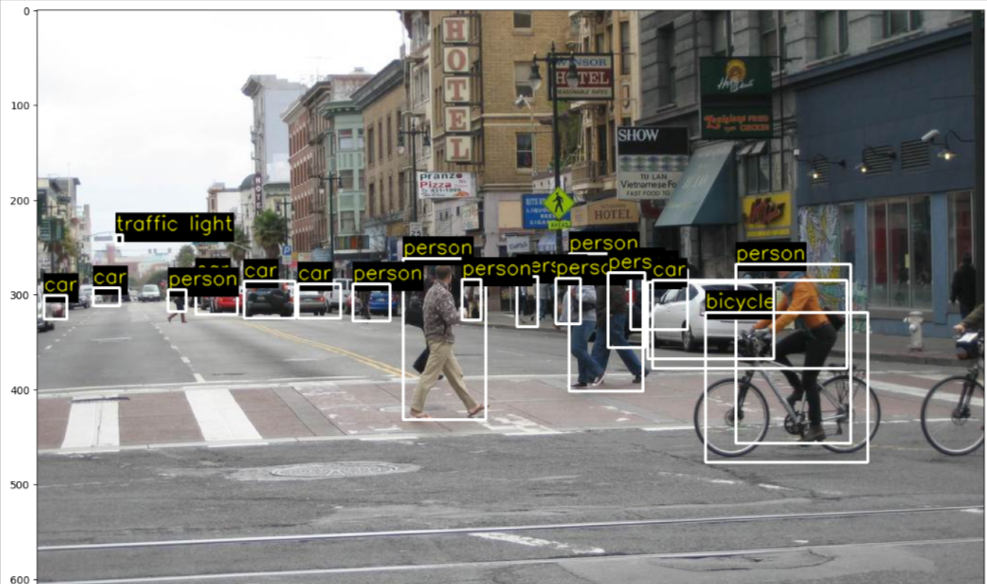
Input 1
im = cv2.imread(os.path.join("images", "street.jpg"))
objects = detect_objects(net, im)
display_objects(im, objects)
- As you see here the model detected all kinds of objects even some way in the distance such as a traffic light
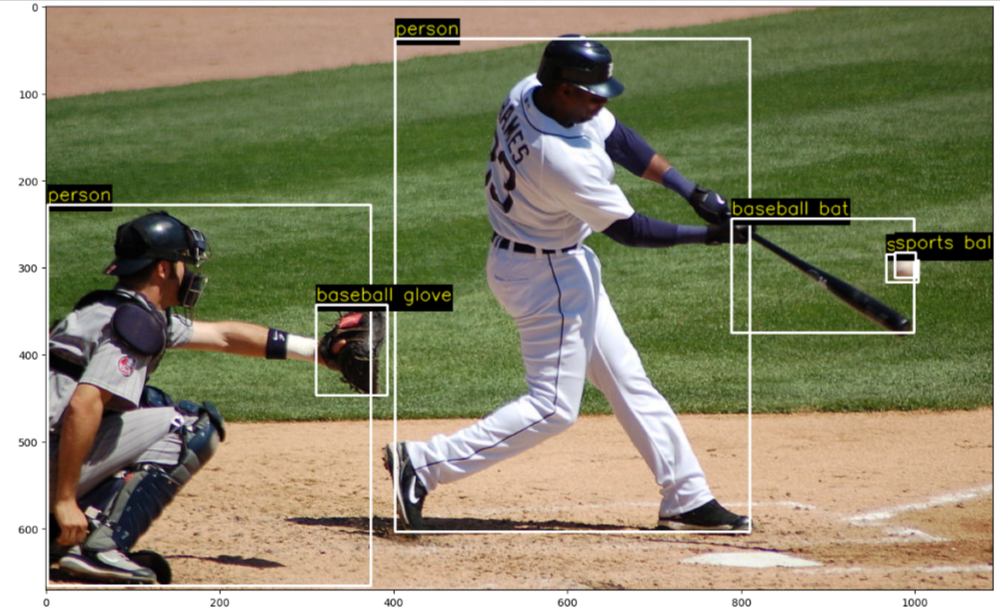
Input 2
im = cv2.imread(os.path.join("images", "baseball.jpg"))
objects = detect_objects(net, im)
display_objects(im, objects, 0.2)
- It does seem to detect the ball twice ( a false positive)
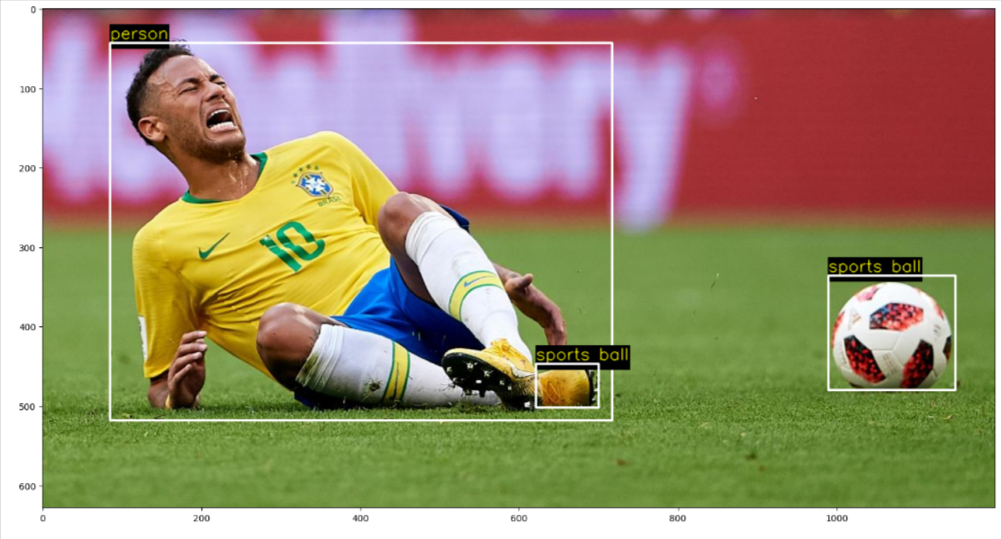
False Positive
im = cv2.imread(os.path.join("images", "soccer.jpg"))
objects = detect_objects(net, im)
display_objects(im, objects)
- Here you see as well that it detected a second sports ball for the tip of the shoe.
- We can hard mining by training the model with additional false positive images to eliminate such detections