import os
os.chdir('path to notebook in Drive')Yolo5 Training - Basics
This is the third page on the basic use of a detection model using
- Our own images
- Labeling our own images
- Extracting the object information from each image file and creating .txt file for each image filename
- Now that our data is ready with a training and testing sets we are ready to proceed training and testing with Yolo
- First we need to setup a YAML file, we will name it data.yaml
Setup YAML file
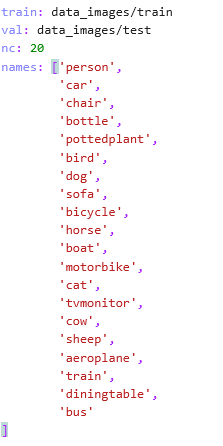
The YAML file will contain all the information regarding the classes such as this

- As you see we provide the model with the path to the training and testing data
- We provide the name count as nc (20 in this case)
- List of the names we have in the images
GPU
It’s much more expedient to run your models on a GPU, so if you don’t have access to one, Google Colab offers the use of one on a free basis.
Let’s pretend we will use Google Colab
Google Colab
- From google drive > add more apps
- Install colab
- If you want to, access colab directly from: colab.research.google.com
- Or from Drive > right click > new folder > name it: yolo_train > next
- To create colab notebook: Open the file > from inside the folder, Right Click > Colab
- Rename the file, it will have ipynb extension
- Refresh the page and you’ll see the new name of the file
Connect to GPU
- With the file open > Menu Tab: Runtime > Change Runtime Type
- By default : None
- To connect to GPU/TPU you have 12 hours which might not be applicable
- Click on the option > save
- In the upper right on the menu bar > Connect > It will change status and show the RAM and Disk resources
- When you are not running anything > Terminate session
- Idle time is counted as well
Terminate session: whenever you are not running anything on the GPU, Terminate session: From Menu bar > Runtime > Manage Sessions > TERMINATE
Connect Colab to Drive
- This is pretty much already connected but in case
- If you are inside colab and want to access notebooks in Drive
- Left panel > Folder > Now look in Left Top bar > Folder > Mount Drive Option > Connect Drive appears when you scroll over folder > Click on it
- Now Drive will appear in the File Tree > access the files in Drive
- Remember we are working from inside the notebook
Extract Path to Notebook
- In order to direct the model to our notebook/code we need to extract the path to our notebook
- We can do that with by > expand the file tree to get to out notebook > right click > copy path > insert path in the () below
- so what we have done is change directories to where our notebook is
- We can verify that by using ls
# This will list the files in the current directory we just changed to, so let's see if we are in the correct directory
ls
OUTPUT> yolo_training.ipynb- The next set of instructions could be outdated by now
Yolo5
If you with to use Yolo5, you need to clone it from github up to your notebook ( this could become outdated soon) but anyways here are the steps