~..> python -m venv .venv

# Activate env
~ >.venv\Scripts\activate
# In linux
source .venv/bin/activate

# To deactivate
~ >deactivateY8 Pretrained Images 1
On this page we will start by using pre-trained YOLOv8 and rung it on simple images we have and see how it detects, then we will proceed and use it on a live-feed camera in the next page.
This page is part of projects in cvz folder and the corresponding notebook can be found there.
Setup
venv
Setup a .venv for this project either in the command prompt as shown below or using Pycharm or whatever editor you use
.
Requirements File
- In the same folder where the venv is located let’s create a document to track all the requirements
- You can either do it in advance like the step above, but in most cases you might end up adding another requirement, so what I end up doing is installing what I think I need and if I ever install something else I will repeat this step
- Use this command to create the requirements text file, I attach the venv name to the file but not needed because in reality you should have one venv for every requirement file!
# Linux
python3 -m pip freeze > requirements.txt
# Windows
py -m pip freeze > requrirements.txt
Install Requirements
- Make sure all the requirements are installed in the activated .venv
- If we created the list of requirements in the text file above and we want to install it
- Use the code below
- venv name is .venv
- requirements file is requirements.txt
(.venv) ~ > pip install -r requirements.txtJupyter Notebook Kernel
- Since we will use jupyter notebook let’s create a kernel inside venv so we can access it from the options within the notebook
- Use this command while the .venv is activated
# First install ipykernel in the venv. I had alot of issues with jupyter not finding cv2 even though you can see it in the lib/packages folder. So I had to delete everything and make sure to run this command which will install the ipykernel in the venv. After that it had no problem finding all the installed packages
(.venv) ~currentdirectory> pip install ipykernel

# Register the venv Kernel
(.venv) ~currentdirectory>python -m ipykernel install --user --name=.venv --display-name "od_proj1"
Installed kernelspec venv_opencv in ~\AppData\Roaming\jupyter\kernels\.venv

# Open jupyter notebook from inside the .venv
(.venv) ~currentdirectory>jupyter notebook
To uninstall the kernel
jupyter-kernel-spec uninstall .venvOpen Jupyter Notebook
- Open the notebook and start the work. The notebooks will be saved in the same folder as the venv_opencv
- Images are in the same directory in folder: images. The name of the images are: street, kids, baseball, giraffe-zebra, soccer
- Let’s start with a new notebook: yolo8_basic1.ipynb
Packages
Install Ultralytics
(.venv) ~ > pip install ultralytics


Using cached MarkupSafe-3.0.2-cp312-cp312-win_amd64.whl (15 kB)
Using cached mpmath-1.3.0-py3-none-any.whl (536 kB)
Installing collected packages: pytz, py-cpuinfo, mpmath, urllib3, tzdata, typing-extensions, tqdm, sympy, setuptools, pyyaml, pyparsing, pillow, numpy, networkx, MarkupSafe, kiwisolver, idna, fsspec, fonttools, filelock, cycler, charset-normalizer, certifi, scipy, requests, pandas, opencv-python, jinja2, contourpy, torch, matplotlib, ultralytics-thop, torchvision, seaborn, ultralytics
Successfully installed MarkupSafe certifi charset-normalizer contourpy cycler filelock fonttools fsspec idna jinja2 kiwisolver matplotlib mpmath networkx numpy opencv-python pandas pillow py-cpuinfo pyparsing pytz pyyaml requests scipy seaborn setuptools sympy torch torchvision tqdm typing-extensions tzdata ultralytics ultralytics-thop urllib3
Import YOLO
- Before we start we have to make sure ultralytics is installed as we did above, so at cmd prompt in our venv:
pip install ultralytics - Code below will: Import YOLO from the creator, whatever size we use in the line of code that file will be imported, as you see below the image showing the difference between the two sizes
- As you see the Yolo-Weights folder is imported when we run the model = line of code

- I have the weight folder in the same directory as the project folder so we can access it from other projects we will cover in the next pages, this way we can share the weight folder instead of having a weight folder in each project file
- Opencv we will use later so let’s import it now
- create a model named: model and assign to it: YOLO(args)
- args: here we want to download the weights for whichever specific version we want to try, small, medium, large, nano, in our case since we are using a laptop let’s download the v8l (for version 8 large)
- You can just change the letter and try the other sizes v8l is 86Mb while the nano is 6Mb

- .pt is the extension for weight file
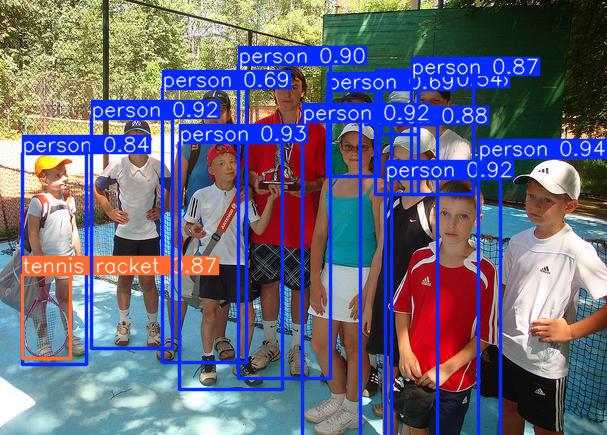
- Next we store the results of the model in: results but the results of what? well we provide the model with an image (the source for this run). Let’s use: images/kids.jpg
- In order to see the image after the model process it we use: show=True
- So far the model will open the image, process it and closes it. In order to stop the model after it opens the image and show us the result after being processed we have to stop it before it closes.
- For that we import cv2 and use the function waitKey(0) which will stop it and do nothing till it receives an input from the user
- Note: we will be using the CPU to run it here, we’ll use GPU later on
from ultralytics import YOLO
import cv2  # we will use this later

model = YOLO('../Yolo-Weights/yolov8l.pt')
Run YOLO
Image 1
- Let’s run YOLO on one image
- We run it and place a waitkey() for it to stop and keep the image open
- 0 inside the waitkey(0) tells it to wait for user input
results = model("images/kids.jpg", show=True)
cv2.waitKey(0)
Creating new Ultralytics Settings v0.0.6 file
View Ultralytics Settings with 'yolo settings' or at 'C:\Users\EMHRC\AppData\Roaming\Ultralytics\settings.json'
Update Settings with 'yolo settings key=value', i.e. 'yolo settings runs_dir=path/to/dir'. For help see https://docs.ultralytics.com/quickstart/#ultralytics-settings.
Downloading https://github.com/ultralytics/assets/releases/download/v8.3.0/yolov8l.pt to '..\Yolo-Weights\yolov8l.pt'...
100%|█████████████████████████████████████████████████████████████████████████████| 83.7M/83.7M [00:03<00:00, 25.2MB/s]
image 1/1 D:\AI\computer_vision\od_projects\cv_course\images\kids.jpg: 480x640 13 persons, 1 tennis racket, 459.5ms
Speed: 1.5ms preprocess, 459.5ms inference, 0.0ms postprocess per image at shape (1, 3, 480, 640)- As you see above after we run it, it detected 13 persons, 1 tennis racket, and it took 459 ms to create the inference.

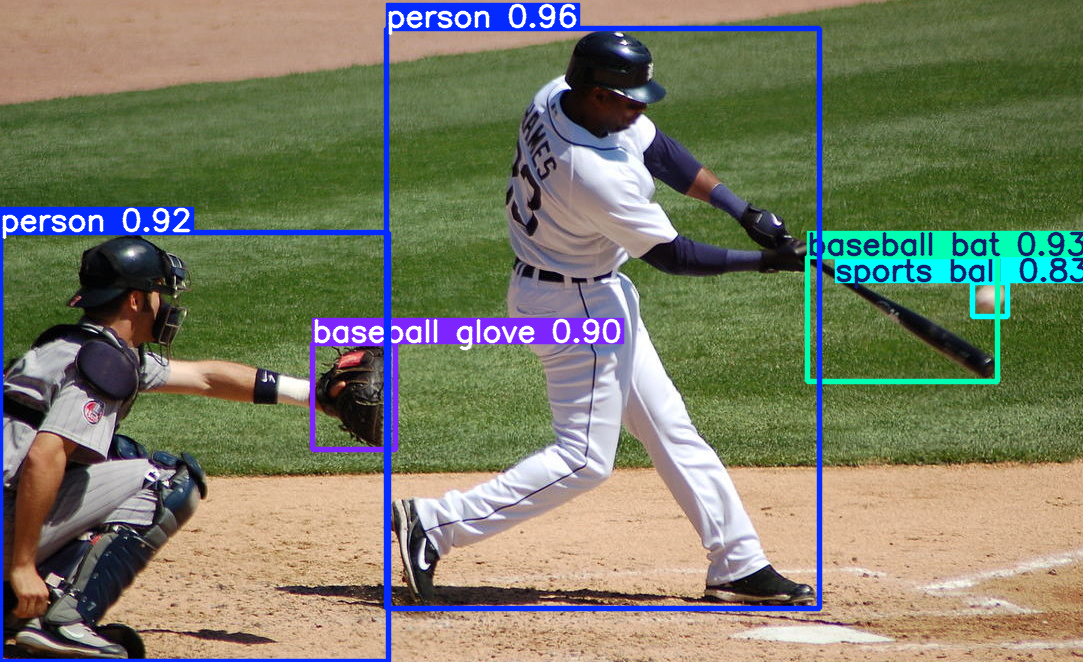
Image 2
- Let’s run the same model on another image
model = YOLO('../Yolo-Weights/yolov8l.pt')
results = model("images/soccer.jpg", show=True)
cv2.waitKey(0)
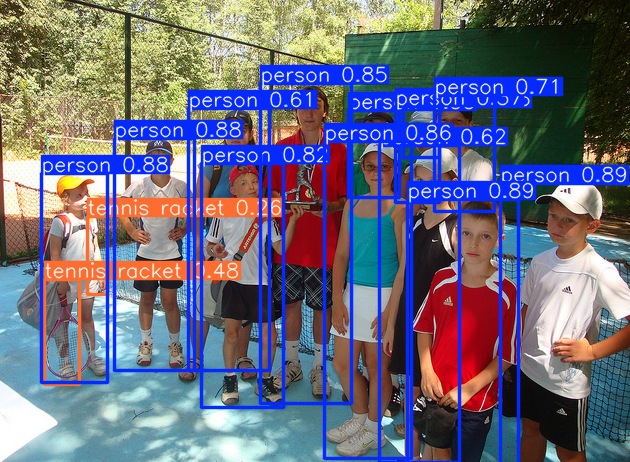
Try Nano
model = YOLO('../Yolo-Weights/yolov8n.pt')
results = model("images/kids.jpg", show=True)
cv2.waitKey(0)
Compare this to the results from the large model earlier, you’ll see that a second tennis racket was detected (yet it doesn’t exist)
You will also notice the confidence levels are not as high as with the larger model
Remember that the larger model is more than 10 times larger but only took mseconds to run on my laptop, we’ll see how it handles when we run videos through it