cap = cv2.VideoCapture("../cars.mp4")
mask = cv2.imread("../car_counter_mask1.png") Masks & Regions
There are many times that we would want to focus on a part of a frame/image, be it to count cars on a road, or product on a conveyor belt or whatever it be. Below are a couple examples of how this can be done.
Mask
- The working complete project can be found in projects Y8 Car Counter page.
- Here is a starting snap shot of what we are dealing with
- You notice below that it is detecting parked cars and other cars turning on and off
- Let’s narrow down the region where we want the model to focus its detection
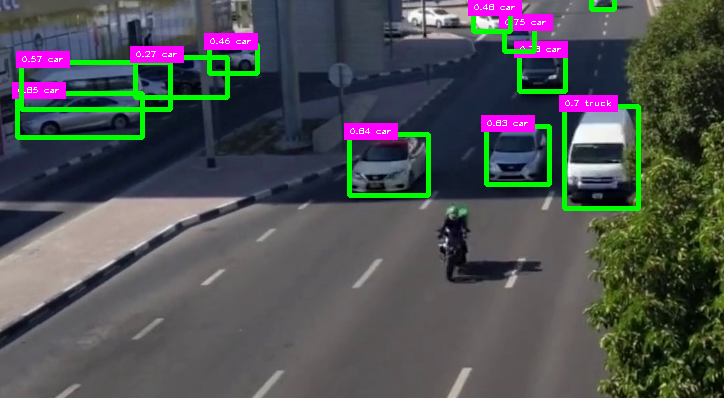
- As you inspect the video you notice that the best detections are right here in front of the stop sign, so the most ideal region would be to focus on the area right around the stop sign over the road
- We can set a mask over the entire video area and only expose the part we want to detect over
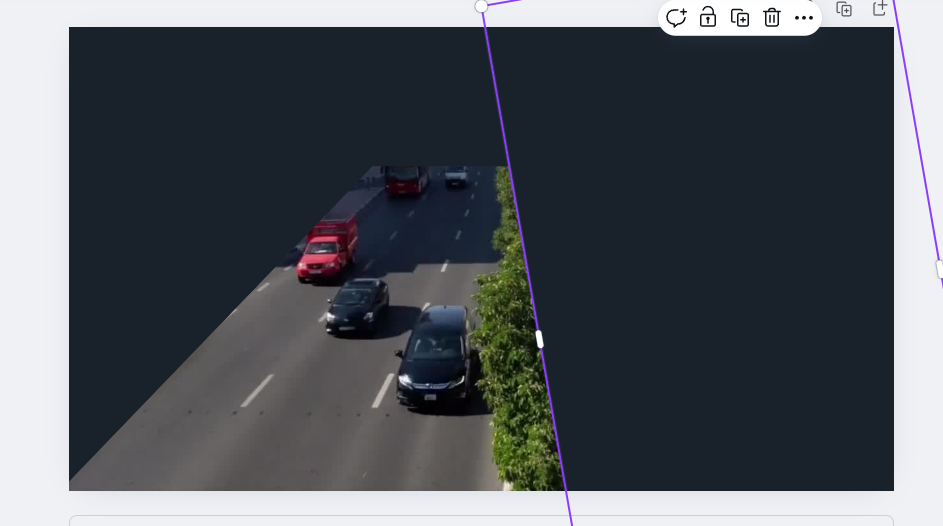
- We can use canva.com, using free account
- Create new design of size 1280x720
- Drag video onto page
- Move it to upper corner and resize it to fill the entire canvas
- Press R –> gives us a rectangle tool
- Draw rectangles to cover the undesired areas
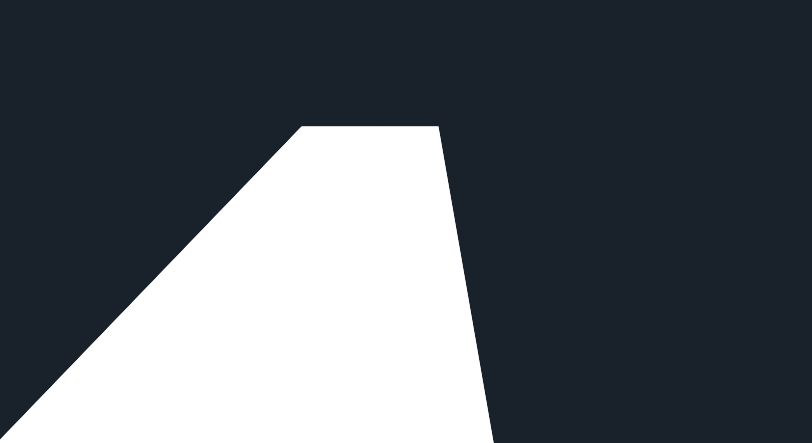
- Color the mask black
- click on the video and delete it from the design
- save the image as: car_counter_mask1.png
- no compression nor transparency
- import the mask to our model folder next to the video
- now we have to lay it over the image(frame) of the video by using bitwise
while cap.isOpened():
    # Read frame from video
    success, frame = cap.read()

    # Place mask over the frame
    imgRegion = cv2.bitwise_and(frame, mask)


    if success:  # if frame is read successfully set the results of the model on the frame
results = model(frame, stream=True)- We also have to display it along with the frame at the end of the loop
- So we add
        cv2.imshow(win_name, frame)

        # display the mask over the frame
        cv2.imshow("MaskedRegion", imgRegion)
        key = cv2.waitKey(0)  # wait for key press
So our code now becomes:
- I intentionally displayed both side by side so we can test if the model is only detecting in the wanted region
- Once testing is done I will eliminate the line showing the masked region from being displayed
- You can clearly see that the cars will not be detected until they enter the desired region
from ultralytics import YOLO
import cv2  # we will use this later
import matplotlib as plt
import math

from cv_utils import *

cap = cv2.VideoCapture("../cars.mp4")  # For Video
mask = cv2.imread("../car_counter_mask1.png")   # For mask

win_name = "Car Counter"

model = YOLO("../Yolo-Weights/yolov8l.pt")

# List of Class names
classNames = ["person", "bicycle", "car", "motorbike", "aeroplane", "bus", "train", "truck", "boat",
              "traffic light", "fire hydrant", "stop sign", "parking meter", "bench", "bird", "cat",
              "dog", "horse", "sheep", "cow", "elephant", "bear", "zebra", "giraffe", "backpack", "umbrella",
              "handbag", "tie", "suitcase", "frisbee", "skis", "snowboard", "sports ball", "kite", "baseball bat",
              "baseball glove", "skateboard", "surfboard", "tennis racket", "bottle", "wine glass", "cup",
              "fork", "knife", "spoon", "bowl", "banana", "apple", "sandwich", "orange", "broccoli",
              "carrot", "hot dog", "pizza", "donut", "cake", "chair", "sofa", "pottedplant", "bed",
              "diningtable", "toilet", "tvmonitor", "laptop", "mouse", "remote", "keyboard", "cell phone",
              "microwave", "oven", "toaster", "sink", "refrigerator", "book", "clock", "vase", "scissors",
              "teddy bear", "hair drier", "toothbrush"
              ]

while cap.isOpened():
    success, frame = cap.read()     # read frame from video
    imgRegion = cv2.bitwise_and(frame, mask)        #place mask over frame

    if success:  # if frame is read successfully set the results of the model on the frame
        # results = model(frame, stream=True)
        results = model(imgRegion, stream=True)     # now we send the masked region to the model instead of the frame

        # Insert Box Extraction section here
        for r in results:
            boxes = r.boxes
            for box in boxes:
                x1, y1, x2, y2 = box.xyxy[0]
                x1, y1, x2, y2 = int(x1), int(y1), int(x2), int(y2)  # convert values to integers
                #cv2.rectangle(frame, (x1, y1), (x2, y2), (0, 255, 0), 3)
                # we can also use a function from cvzone/utils.py called
                # cvzone.cornerRect(img,(x1,y1,w,h))

                # extract the confidence level
                conf = math.ceil(box.conf[0] * 100) / 100

                # extract class ID
                cls = int(box.cls[0])
                wantedClass = classNames[cls]

                # filter out unwanted classes from detection
                if wantedClass == "car" or wantedClass == "bus" or wantedClass == "truck" and conf > 0.3:
                # display both conf & class ID on frame - scale down the bos as it is too big
                    cv2.rectangle(frame, (x1, y1), (x2, y2), (0, 255, 0), 3)
                    putTextRect(frame, f'{conf} {classNames[cls]}', (max(0, x1), max(35, y1)), scale=0.6, thickness=1, offset=5)

        cv2.imshow(win_name, frame)     # display frame
        cv2.imshow("MaskedRegion", imgRegion)   # display mask over frame
        key = cv2.waitKey(0)  # wait for key press
        if key == ord(" "):  # a space bar will display the next frame
            continue
        elif key == 27:  # escape will exit
            break


# Release video capture object and close display window
cap.release()
cv2.destroyAllWindows()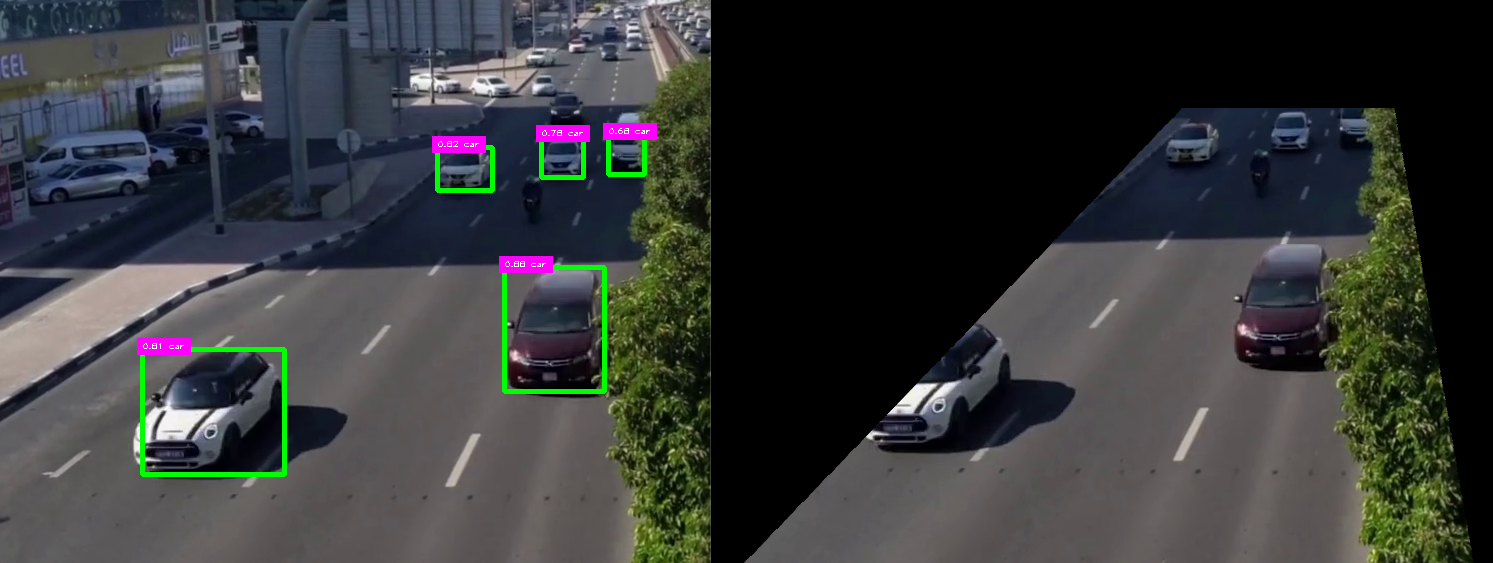
- If we comment out the line below we end up with
cv2.imshow("MaskedRegion", imgRegion) # display mask over frame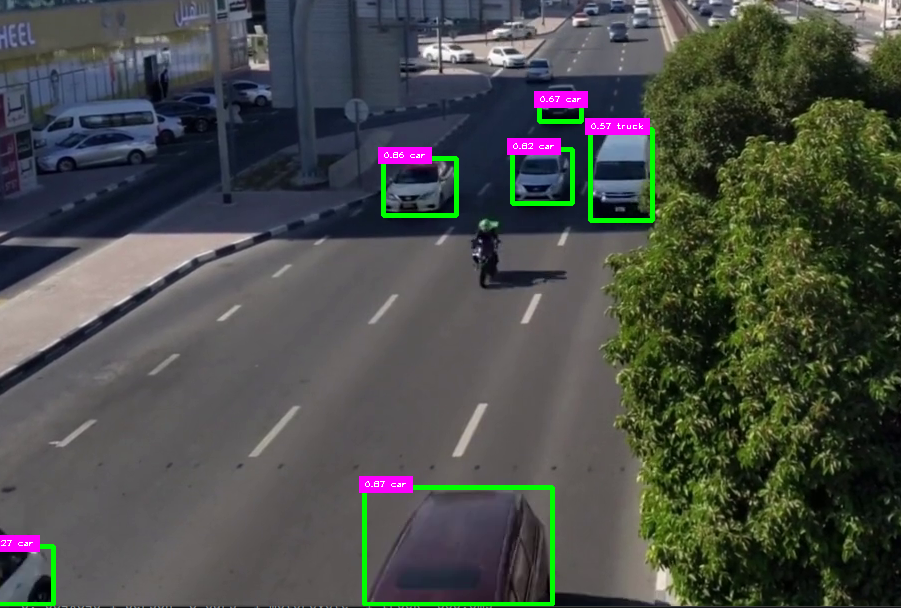
Regions
- Instead of using canva to create a mask, what if we create regions on the screen using coordinates.
- Get the shape of the frame then comment it out
- We create the polygon first
- Then we create a mask from the shape of the polygon and color the mask with zeros
- Fill in the polygon with a black color over the zeros
- The
cv2.fillPoly()function in OpenCV is used to fill the area bounded by one or more polygons on an image. It requires an input image, an array of polygon vertices, and a color to fill the polygons with. - Lay the mask over the image as we did above and run it
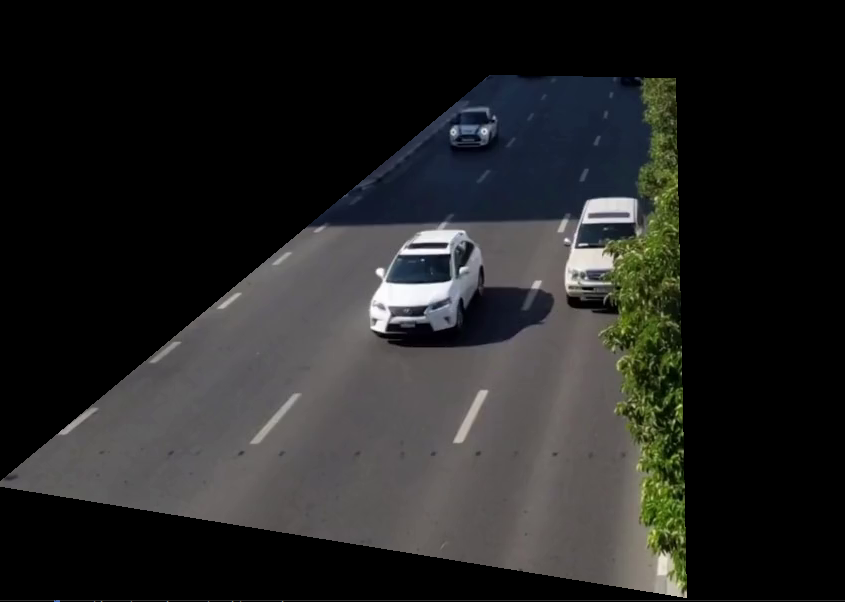
- I left both displays on there to verify the shape of the mask
- We can comment it out to show a very similar area to the image above
import numpy as np
from matplotlib.patches import Polygon
from ultralytics import YOLO
import cv2  # we will use this later
import matplotlib as plt
import math

from cv_utils import *

cap = cv2.VideoCapture("../cars.mp4")  # For Video

# Let's create the region
polygon_coords = [(472,215),(86,720),(754,720),(682,215)]
win_name = "Car Counter"

model = YOLO("../Yolo-Weights/yolov8l.pt")

# List of Class names
classNames = ["person", "bicycle", "car", "motorbike", "aeroplane", "bus", "train", "truck", "boat",
              "traffic light", "fire hydrant", "stop sign", "parking meter", "bench", "bird", "cat",
              "dog", "horse", "sheep", "cow", "elephant", "bear", "zebra", "giraffe", "backpack", "umbrella",
              "handbag", "tie", "suitcase", "frisbee", "skis", "snowboard", "sports ball", "kite", "baseball bat",
              "baseball glove", "skateboard", "surfboard", "tennis racket", "bottle", "wine glass", "cup",
              "fork", "knife", "spoon", "bowl", "banana", "apple", "sandwich", "orange", "broccoli",
              "carrot", "hot dog", "pizza", "donut", "cake", "chair", "sofa", "pottedplant", "bed",
              "diningtable", "toilet", "tvmonitor", "laptop", "mouse", "remote", "keyboard", "cell phone",
              "microwave", "oven", "toaster", "sink", "refrigerator", "book", "clock", "vase", "scissors",
              "teddy bear", "hair drier", "toothbrush"
              ]

while cap.isOpened():
    success, frame = cap.read()     # read frame from video
    #imgRegion = cv2.bitwise_and(frame, mask)        #place mask over frame


    # get frame dimensions
    frame_height, frame_width, _ = frame.shape
    # print(frame_height, frame_width)  # gives us w=720 h=1280

    # Create a blank mask image using an array of zeros of the same shape as the shape of the frame
    mask = np.zeros((frame_height, frame_width), dtype=np.uint8)

    # Draw the polygon on the mask image in black
    cv2.fillPoly(mask, [np.array(polygon_coords)],255)

    maskedRegion = cv2.bitwise_and(frame, frame, mask=mask)

    if success:  # if frame is read successfully set the results of the model on the frame
        results = model(frame, stream=True)
        results = model(maskedRegion, stream=True)     # now we send the masked region to the model instead of the frame

        # Insert Box Extraction section here
        for r in results:
            boxes = r.boxes
            for box in boxes:
                x1, y1, x2, y2 = box.xyxy[0]
                x1, y1, x2, y2 = int(x1), int(y1), int(x2), int(y2)  # convert values to integers
                #cv2.rectangle(frame, (x1, y1), (x2, y2), (0, 255, 0), 3)
                # we can also use a function from cvzone/utils.py called
                # cvzone.cornerRect(img,(x1,y1,w,h))

                # extract the confidence level
                conf = math.ceil(box.conf[0] * 100) / 100

                # extract class ID
                cls = int(box.cls[0])
                wantedClass = classNames[cls]

                # filter out unwanted classes from detection
                if wantedClass == "car" or wantedClass == "bus" or wantedClass == "truck" and conf > 0.3:
                # display both conf & class ID on frame - scale down the bos as it is too big
                    cv2.rectangle(frame, (x1, y1), (x2, y2), (0, 255, 0), 3)
                    putTextRect(frame, f'{conf} {classNames[cls]}', (max(0, x1), max(35, y1)), scale=0.6, thickness=1, offset=5)

        cv2.imshow(win_name, frame)     # display frame
        cv2.imshow("MaskedRegion", maskedRegion)   # display mask over frame comment out after testing
        key = cv2.waitKey(0)  # wait for key press
        if key == ord(" "):  # a space bar will display the next frame
            continue
        elif key == 27:  # escape will exit
            break


# Release video capture object and close display window
cap.release()
cv2.destroyAllWindows()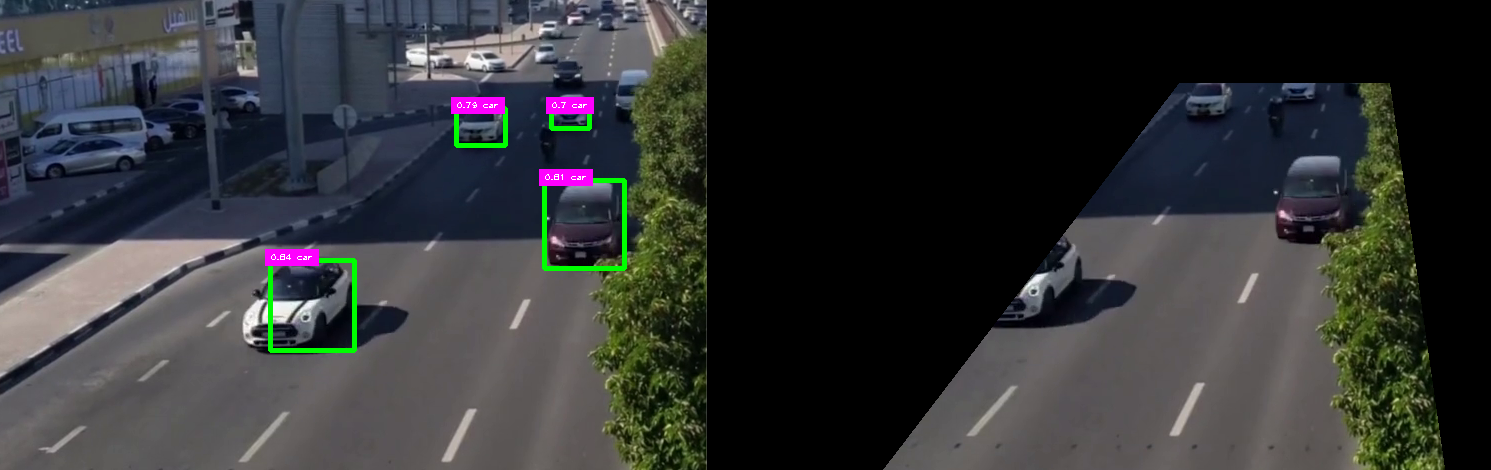
Another way
- Or it can be done this way as well, by editing the region area
import numpy as np
from matplotlib.patches import Polygon
from ultralytics import YOLO
import cv2  # we will use this later
import matplotlib as plt
import math

from cv_utils import *

cap = cv2.VideoCapture("../cars.mp4")  # For Video
# mask = cv2.imread("../car_counter_mask1.png")   # For mask

# Let's create the region
detectRegion = [
    {
        "name":"YOv8 Car Detecting Region",
        "polygon": [(472,215),(86,720),(754,720),(682,215)],
        "dragging": True,
        "region_color": (37,255,225),
        "text_color": (0,0,0,),
    },
]
#polygon_coords = [(472,215),(86,720),(754,720),(682,215)]
win_name = "Car Counter"

model = YOLO("../Yolo-Weights/yolov8l.pt")

# List of Class names
classNames = ["person", "bicycle", "car", "motorbike", "aeroplane", "bus", "train", "truck", "boat",
              "traffic light", "fire hydrant", "stop sign", "parking meter", "bench", "bird", "cat",
              "dog", "horse", "sheep", "cow", "elephant", "bear", "zebra", "giraffe", "backpack", "umbrella",
              "handbag", "tie", "suitcase", "frisbee", "skis", "snowboard", "sports ball", "kite", "baseball bat",
              "baseball glove", "skateboard", "surfboard", "tennis racket", "bottle", "wine glass", "cup",
              "fork", "knife", "spoon", "bowl", "banana", "apple", "sandwich", "orange", "broccoli",
              "carrot", "hot dog", "pizza", "donut", "cake", "chair", "sofa", "pottedplant", "bed",
              "diningtable", "toilet", "tvmonitor", "laptop", "mouse", "remote", "keyboard", "cell phone",
              "microwave", "oven", "toaster", "sink", "refrigerator", "book", "clock", "vase", "scissors",
              "teddy bear", "hair drier", "toothbrush"
              ]

while cap.isOpened():
    success, frame = cap.read()     # read frame from video

    # get frame dimensions
    frame_height, frame_width, _ = frame.shape
    # print(frame_height, frame_width)  # gives us w=720 h=1280

    # Create a blank mask image using an array of zeros of the same shape as the shape of the frame
    mask = np.zeros((frame_height, frame_width), dtype=np.uint8)

    # Fill the mask in black
    #cv2.fillPoly(mask, [np.array(polygon_coords)],255)
    cv2.fillPoly(mask, [np.array(detectRegion[0]["polygon"])],255)
    #print(detectRegion[0]["polygon"])
    # Lay the mask over the frame
    maskedRegion = cv2.bitwise_and(frame, frame, mask=mask)

    if success:  # if frame is read successfully set the results of the model on the frame
        results = model(frame, stream=True)  # comment out after testing
        results = model(maskedRegion, stream=True)     # now we send the masked region to the model instead of the frame

        # Insert Box Extraction section here
        for r in results:
            boxes = r.boxes
            for box in boxes:
                x1, y1, x2, y2 = box.xyxy[0]
                x1, y1, x2, y2 = int(x1), int(y1), int(x2), int(y2)  # convert values to integers
                #cv2.rectangle(frame, (x1, y1), (x2, y2), (0, 255, 0), 3)
                # we can also use a function from cvzone/utils.py called
                # cvzone.cornerRect(img,(x1,y1,w,h))

                # extract the confidence level
                conf = math.ceil(box.conf[0] * 100) / 100

                # extract class ID
                cls = int(box.cls[0])
                wantedClass = classNames[cls]

                # filter out unwanted classes from detection
                if wantedClass == "car" or wantedClass == "bus" or wantedClass == "truck" and conf > 0.3:
                # display both conf & class ID on frame - scale down the bos as it is too big
                    cv2.rectangle(frame, (x1, y1), (x2, y2), (0, 255, 0), 3)
                    putTextRect(frame, f'{conf} {classNames[cls]}', (max(0, x1), max(35, y1)), scale=0.6, thickness=1, offset=5)

        cv2.imshow(win_name, frame)     # display frame
        cv2.imshow("MaskedRegion", maskedRegion)   # display mask over frame comment out after testing
        key = cv2.waitKey(0)  # wait for key press
        if key == ord(" "):  # a space bar will display the next frame
            continue
        elif key == 27:  # escape will exit
            break


# Release video capture object and close display window
cap.release()
cv2.destroyAllWindows()
ROI - Dynamic On Screen
This is my favorite, can be used in many applications but most users that lack experience will stick with the hard coded versions above.
The idea is to be able to draw the mask on the image/frame instead of coding in or creating a mask via an image/video processing software
- You just click and drag your mouse to the area you wish to use as the wanted region
- I will make use of the OpenCV package and specifically the Region of Interest function ROI
import cv2
import math
from ultralytics import YOLO
from cv_utils import *

# Initialize Vars
drawing = False
pt1 = (0,0)
pt2 = (0,0)
pt3 = (0,0)
pt4 = (0,0)
roi= [pt1, pt2, pt3, pt4]
click_count = 0
i = 0
continue_clicking = True

# Capture mouse movement function
def draw_roi(event, x, y,  flags, param):
    global click_count, continue_clicking, roi
    if continue_clicking:
        if event == cv2.EVENT_LBUTTONDOWN:
            if click_count == 0:
                roi[0] = (x,y)
            if click_count == 1:
                roi[1] = (x, y)
            if click_count == 2:
                roi[2] = (x, y)
            if click_count == 3:
                roi[3] = (x, y)
                continue_clicking = False
            click_count += 1

# Load Video
cap = cv2.VideoCapture("../cars.mp4")
win_name = "Car Counter"

# List of Class names
classNames = ["person", "bicycle", "car", "motorbike", "aeroplane", "bus", "train", "truck", "boat",
              "traffic light", "fire hydrant", "stop sign", "parking meter", "bench", "bird", "cat",
              "dog", "horse", "sheep", "cow", "elephant", "bear", "zebra", "giraffe", "backpack", "umbrella",
              "handbag", "tie", "suitcase", "frisbee", "skis", "snowboard", "sports ball", "kite", "baseball bat",
              "baseball glove", "skateboard", "surfboard", "tennis racket", "bottle", "wine glass", "cup",
              "fork", "knife", "spoon", "bowl", "banana", "apple", "sandwich", "orange", "broccoli",
              "carrot", "hot dog", "pizza", "donut", "cake", "chair", "sofa", "pottedplant", "bed",
              "diningtable", "toilet", "tvmonitor", "laptop", "mouse", "remote", "keyboard", "cell phone",
              "microwave", "oven", "toaster", "sink", "refrigerator", "book", "clock", "vase", "scissors",
              "teddy bear", "hair drier", "toothbrush"
              ]

model = YOLO("../Yolo-Weights/yolov8l.pt")

while cap.isOpened():
    success, frame = cap.read()
    # get shape of frame and create blank mask
    frame_height, frame_width, _ = frame.shape
    # create blank mask
    mask = np.zeros((frame_height, frame_width), dtype=np.uint8)

    if success:
        if continue_clicking:
            cv2.imshow(win_name, frame)
            cv2.setMouseCallback(win_name, draw_roi)
            key = cv2.waitKey(0)
            if key == 27:  # escape will exit
                print(roi)
                cv2.destroyAllWindows()
        if not continue_clicking:
            # draw ROI on the mask
            points = np.array([roi[0], roi[1], roi[2], roi[3]])
            cv2.fillPoly(mask, [points], 255)

            # Lay the mask over the frame
            maskedRegion = cv2.bitwise_and(frame, frame, mask=mask)
            #results = model(frame, stream=True)
            results = model(maskedRegion, stream=True)  # now we send the masked region to the model instead of the frame

            # Insert Box Extraction section here
            for r in results:
                boxes = r.boxes
                for box in boxes:
                    x1, y1, x2, y2 = box.xyxy[0]
                    x1, y1, x2, y2 = int(x1), int(y1), int(x2), int(y2)  # convert values to integers
                    # cv2.rectangle(frame, (x1, y1), (x2, y2), (0, 255, 0), 3)
                    # we can also use a function from cvzone/utils.py called
                    # cvzone.cornerRect(img,(x1,y1,w,h))

                    # extract the confidence level
                    conf = math.ceil(box.conf[0] * 100) / 100

                    # extract class ID
                    cls = int(box.cls[0])
                    wantedClass = classNames[cls]

                    # filter out unwanted classes from detection
                    if wantedClass == "car" or wantedClass == "bus" or wantedClass == "truck" and conf > 0.3:
                        # display both conf & class ID on frame - scale down the bos as it is too big
                        cv2.rectangle(frame, (x1, y1), (x2, y2), (0, 255, 0), 3)
                        putTextRect(frame, f'{conf} {classNames[cls]}', (max(0, x1), max(35, y1)), scale=0.6,
                                    thickness=1, offset=5)

            cv2.imshow(win_name, frame)  # display frame
            #cv2.imshow("MaskedRegion", maskedRegion)  # display mask over frame
            key = cv2.waitKey(0)  # wait for key press
            if key == ord(" "):  # a space bar will display the next frame
                continue
            elif key == 27:  # escape will exit
                break

# Release video capture object and close display window
cap.release()
cv2.destroyAllWindows()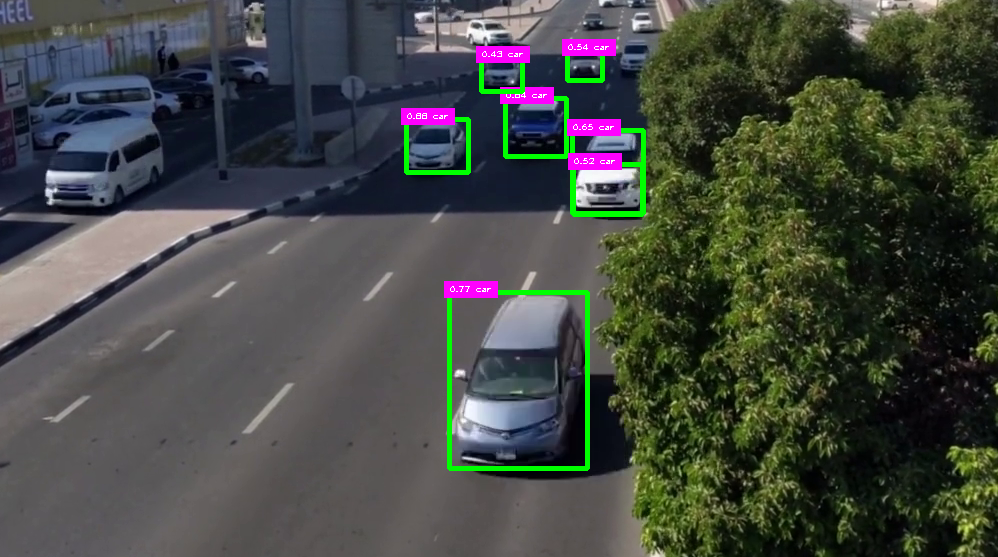
Dynamic with Preview
I’ve edited the above to include a preview process, since the code above takes the coordinates and creates a mask, it is almost impossible to know if the mask is actually where we wanted it to be. It does display it but hard to sync it visually with the video itself.
Code is found in working_dynamic_mask_with_preview.py
In this version it will
- Once at least 4 points are entered
- Use the Esc key to overlay the mask over the video for verification
- If the mask looks good press Esc again to remove the visual overlay
- Wait a few seconds as the accurate masked region is not being fed into the prediction model
- Now you will see the BB appear
- I have it setup so the space bar will move the movie to the next frame
import cv2
import math
from ultralytics import YOLO
from cv_utils import *

# Initialize Vars
drawing = False
pt1 = (0,0)
pt2 = (0,0)
pt3 = (0,0)
pt4 = (0,0)
roi= [pt1, pt2, pt3, pt4]
click_count = 0
i = 0
continue_clicking = True
shown = False

# Capture mouse movement function
def draw_roi(event, x, y,  flags, param):
    global click_count, continue_clicking, roi
    if continue_clicking:
        if event == cv2.EVENT_LBUTTONDOWN:
            if click_count == 0:
                roi[0] = (x,y)
            if click_count == 1:
                roi[1] = (x, y)
            if click_count == 2:
                roi[2] = (x, y)
            if click_count == 3:
                roi[3] = (x, y)
                continue_clicking = False
            click_count += 1

# Load Video
cap = cv2.VideoCapture("../cars.mp4")
win_name = "Car Counter"

# List of Class names
classNames = ["person", "bicycle", "car", "motorbike", "aeroplane", "bus", "train", "truck", "boat",
              "traffic light", "fire hydrant", "stop sign", "parking meter", "bench", "bird", "cat",
              "dog", "horse", "sheep", "cow", "elephant", "bear", "zebra", "giraffe", "backpack", "umbrella",
              "handbag", "tie", "suitcase", "frisbee", "skis", "snowboard", "sports ball", "kite", "baseball bat",
              "baseball glove", "skateboard", "surfboard", "tennis racket", "bottle", "wine glass", "cup",
              "fork", "knife", "spoon", "bowl", "banana", "apple", "sandwich", "orange", "broccoli",
              "carrot", "hot dog", "pizza", "donut", "cake", "chair", "sofa", "pottedplant", "bed",
              "diningtable", "toilet", "tvmonitor", "laptop", "mouse", "remote", "keyboard", "cell phone",
              "microwave", "oven", "toaster", "sink", "refrigerator", "book", "clock", "vase", "scissors",
              "teddy bear", "hair drier", "toothbrush"
              ]

model = YOLO("../Yolo-Weights/yolov8l.pt")

while cap.isOpened():
    success, frame = cap.read()
    # get shape of frame and create blank mask
    frame_height, frame_width, _ = frame.shape
    # create blank mask
    mask = np.zeros((frame_height, frame_width), dtype=np.uint8)

    if success:
        while continue_clicking:
            cv2.imshow(win_name, frame)
            cv2.setMouseCallback(win_name, draw_roi)
            key = cv2.waitKey(0)
            if key == 27:  # escape will exit
                print(roi)  # print coordinates to check accuracy
                break
        if not continue_clicking:
            # draw ROI on the mask
            points = np.array([roi[0], roi[1], roi[2], roi[3]])
            cv2.fillPoly(mask, [points], 255)

            # Lay the mask over the frame to preview it
            maskedRegion = cv2.bitwise_and(frame, frame, mask=mask)
            # display mask to verify
            if not shown:
                cv2.imshow("overlay", maskedRegion)
                shown = True
            key = cv2.waitKey()
            if key == 27:  # esc will remove the mask overlay display
                if shown:
                    cv2.destroyWindow("overlay")
            # feed the maskedRegion through the model to detect objects
            #results = model(frame, stream=True)
            results = model(maskedRegion, stream=True)  # now we send the masked region to the model instead of the frame

            # Insert Box Extraction section here
            for r in results:
                boxes = r.boxes
                for box in boxes:
                    x1, y1, x2, y2 = box.xyxy[0]
                    x1, y1, x2, y2 = int(x1), int(y1), int(x2), int(y2)  # convert values to integers
                    # cv2.rectangle(frame, (x1, y1), (x2, y2), (0, 255, 0), 3)
                    # we can also use a function from cvzone/utils.py called
                    # cvzone.cornerRect(img,(x1,y1,w,h))

                    # extract the confidence level
                    conf = math.ceil(box.conf[0] * 100) / 100

                    # extract class ID
                    cls = int(box.cls[0])
                    wantedClass = classNames[cls]

                    # filter out unwanted classes from detection
                    if wantedClass == "car" or wantedClass == "bus" or wantedClass == "truck" and conf > 0.3:
                        # display both conf & class ID on frame - scale down the bos as it is too big
                        cv2.rectangle(frame, (x1, y1), (x2, y2), (0, 255, 0), 3)
                        putTextRect(frame, f'{conf} {classNames[cls]}', (max(0, x1), max(35, y1)), scale=0.6,
                                    thickness=1, offset=5)

            cv2.imshow(win_name, frame)  # display frame
            #cv2.imshow("MaskedRegion", maskedRegion)  # display mask over frame
            key = cv2.waitKey(0)  # wait for key press
            if key == ord(" "):  # a space bar will display the next frame
                continue
            elif key == 27:  # escape will exit
                break

# Release video capture object and close display window
cap.release()
cv2.destroyAllWindows()- Here are some images. Once the four points have been chosen, press Escape to display the mask
- Press escape again to go back to the video. If the mask is not accurate then press Escape twice to start over again.
- If I have more time I will work on being able to drag the existing lines till then this is good enough as I don’t use this that often
- Below you see the video with the detection in the maskedRegion which appear a second or so after you Esc the mask overlay above
