filterpy==1.4.5
scikit-image==0.17.2
pip Tracking
Tracking a detected object from frame to frame is accomplished in several ways. We will cover a basic package first and go on from there.
Sort
Sort can befound here on github. It is a simple online and realtime tracking algorithm for 2D multiple object tracking in video sequences.
So we download the sort.py to our local directory
Requirements are
Here are the basic steps to use in our own project:
from sort import *

#create instance of SORT
mot_tracker = Sort()

# get detections
...

# update SORT
track_bbs_ids = mot_tracker.update(detections)

# track_bbs_ids is a np array where each row contains a valid bounding box and track_id (last column)
...
So we need to set a max_age argument of how long we wait after detecting, minimum hits in the region we chose, iou threshold. They are all set at default, and we can experiment if we wish to.
The we call the tracker with an update call with a list of detections.
- We already have the detections, but we need to put them in a format the sort function requires
- So go back into sort.py and def update()
  def update(self, dets=np.empty((0, 5))):
    """
    Params:
      dets - a numpy array of detections in the format [[x1,y1,x2,y2,score],[x1,y1,x2,y2,score],...]
    Requires: this method must be called once for each frame even with empty detections (use np.empty((0, 5)) for frames without detections).
    Returns the a similar array, where the last column is the object ID.

    NOTE: The number of objects returned may differ from the number of detections provided.
"""- And in return the function puts out x1, y1, x2, y2, and an ID#
from sort import *

# Create an instance for our tracker/sort
tracker = Sort(max_age=20, min_hits=3, iou_threshold=0.3)

tracker.update(detections)- so right after we get the results from our model we need to create an array of detections of the same type as the input of update()
detections = np.empty((0, 5))- Then we collect the values of x, y and conf from our results and vstack them to the bottom of the array we created named detections
currentArray = np.array([x1,y1,x2,y2,conf])
detections = np.vstack((detections,currentArray))- now go back and assign the update tracker to a var named: resultsTracker
- Then we loop through the results to extract the ID
        resultsTracker = tracker.update(detections)
        for result in resultsTracker:
            x1,y1,x2,y2,Id = result
            print(result)
If we run it now we see that the output printed is listing x, y, and ID for each object. Now we can go in the code and adjust what is displayed with the BB


New BB
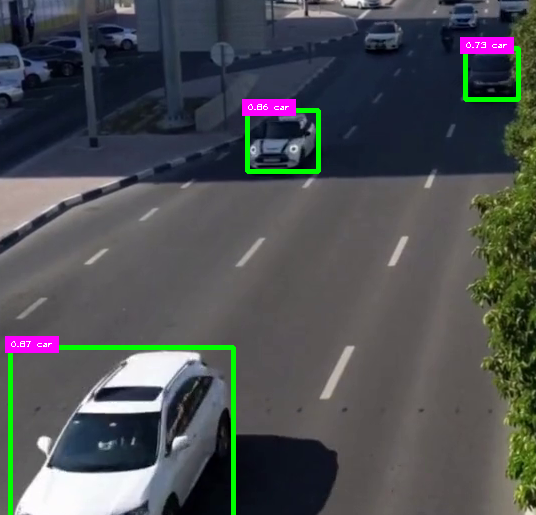
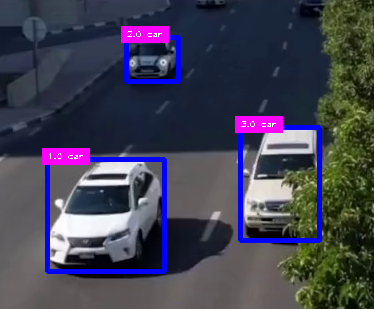
- Let’s draw new BB based on the tracker results, remember the x,y and ID are what is being passed from sort.
- Values returned from update() are float so we have to convert them to integers
- We will display the class as well for testing then remove it
- Also go back up and comment out the BB drawn in the image above
        # Call the sort/tracker function and extract results
        resultsTracker = tracker.update(detections)
        for result in resultsTracker:
            x1,y1,x2,y2,Id = result
            x1, y1, x2, y2 = int(x1), int(y1), int(x2), int(y2)  # convert values to integers
            print(result)
            # display new BB and labels
            cv2.rectangle(frame, (x1, y1), (x2, y2), (255,0,0), 3)
            putTextRect(frame, f'{Id} {classNames[cls]}', (max(0, x1), max(35, y1)), scale=0.6, thickness=1, offset=5)
As you see now we are getting class and Id
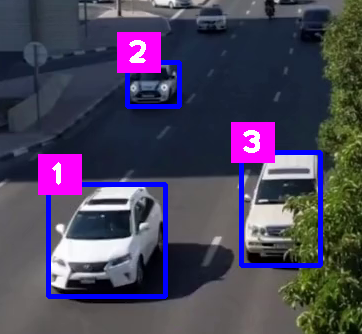
- Let’s edit the display
putTextRect(frame, f'{int(Id)}', (max(0, x1), max(35, y1)), scale=2, thickness=3, offset=10)
- If we press the space bar to the next frame you’ll see that the ID is moving with the same object.
Code
Code for this can be found in car_counter1.py
import numpy as np
from ultralytics import YOLO
import cv2  # we will use this later
import matplotlib as plt
import math
from cv_utils import *
from sort import *

cap = cv2.VideoCapture("../cars.mp4")  # For Video
mask = cv2.imread("../car_counter_mask1.png")   # For mask

# Create an instance for our tracker/sort
tracker = Sort(max_age=20, min_hits=3, iou_threshold=0.3)


win_name = "Car Counter"

model = YOLO("../Yolo-Weights/yolov8l.pt")

# List of Class names
classNames = ["person", "bicycle", "car", "motorbike", "aeroplane", "bus", "train", "truck", "boat",
              "traffic light", "fire hydrant", "stop sign", "parking meter", "bench", "bird", "cat",
              "dog", "horse", "sheep", "cow", "elephant", "bear", "zebra", "giraffe", "backpack", "umbrella",
              "handbag", "tie", "suitcase", "frisbee", "skis", "snowboard", "sports ball", "kite", "baseball bat",
              "baseball glove", "skateboard", "surfboard", "tennis racket", "bottle", "wine glass", "cup",
              "fork", "knife", "spoon", "bowl", "banana", "apple", "sandwich", "orange", "broccoli",
              "carrot", "hot dog", "pizza", "donut", "cake", "chair", "sofa", "pottedplant", "bed",
              "diningtable", "toilet", "tvmonitor", "laptop", "mouse", "remote", "keyboard", "cell phone",
              "microwave", "oven", "toaster", "sink", "refrigerator", "book", "clock", "vase", "scissors",
              "teddy bear", "hair drier", "toothbrush"
              ]

while True:
    success, frame = cap.read()     # read frame from video
    imgRegion = cv2.bitwise_and(frame, mask)        #place mask over frame

    if success:  # if frame is read successfully set the results of the model on the frame
        # results = model(frame, stream=True)
        results = model(imgRegion, stream=True)     # now we send the masked region to the model instead of the frame

        # create a list of detections to use as input to tracker.update() below
        detections = np.empty((0, 5))

        # Insert Box Extraction section here
        for r in results:
            boxes = r.boxes
            for box in boxes:
                x1, y1, x2, y2 = box.xyxy[0]
                x1, y1, x2, y2 = int(x1), int(y1), int(x2), int(y2)  # convert values to integers
                #cv2.rectangle(frame, (x1, y1), (x2, y2), (0, 255, 0), 3)
                # we can also use a function from cvzone/utils.py called
                # cvzone.cornerRect(img,(x1,y1,w,h))

                # extract the confidence level
                conf = math.ceil(box.conf[0] * 100) / 100

                # extract class ID
                cls = int(box.cls[0])
                wantedClass = classNames[cls]

                # filter out unwanted classes from detection
                if wantedClass == "car" or wantedClass == "bus" or wantedClass == "truck" and conf > 0.3:
                # display both conf & class ID on frame - scale down the bos as it is too big - comment since we are displaying Id below
                    #cv2.rectangle(frame, (x1, y1), (x2, y2), (0, 255, 0), 3)
                    #putTextRect(frame, f'{conf} {classNames[cls]}', (max(0, x1), max(35, y1)), scale=0.6, thickness=1, offset=5)
                    currentArray = np.array([x1,y1,x2,y2,conf])
                    detections = np.vstack((detections,currentArray))

        # Call the sort/tracker function and extract results
        resultsTracker = tracker.update(detections)
        for result in resultsTracker:
            x1,y1,x2,y2,Id = result
            x1, y1, x2, y2 = int(x1), int(y1), int(x2), int(y2)  # convert values to integers
            print(result)
            # display new BB and labels
            cv2.rectangle(frame, (x1, y1), (x2, y2), (255,0,0), 3)
            putTextRect(frame, f'{int(Id)}', (max(0, x1), max(35, y1)), scale=2, thickness=3, offset=10)


        cv2.imshow(win_name, frame)     # display frame
        #cv2.imshow("MaskedRegion", imgRegion)   # display mask over frame
        key = cv2.waitKey(0)  # wait for key press
        if key == ord(" "):  # a space bar will display the next frame
            continue
        elif key == 27:  # escape will exit
            break


# Release video capture object and close display window
cap.release()
cv2.destroyAllWindows()